Based on the comments and emails I've received there appear to be some issues with the Diamond Select Cthulhu bank Raven reviewed yesterday. In a number of cases the bottom of the piece is warped, making the bank wobbly or locking in the coin plug.
I'm still waiting for the one I ordered to arrive, but based on my experience with vinyl model kits I would suggest using heat to soften the vinyl on the bottom of the idol. The easiest way is to use a tray of hot water. Not boiling, mind you, but hot enough to be uncomfortable, not painful, if you put your hand in it. Hold the bottom of the bank in the hot water for a minute or two and the vinyl should soften right up. That should allow any stuck plugs to be twisted out. For the warping issue, grab the flange on the plug and pull until the bottom is level, then rinse the vinyl with cold water to set it.
Saturday, July 4, 2015

Friday, July 3, 2015
Cthulhu Fhtagn! Diamond Select Edition.
I was pleasantly surprised last year by the announcement of a vinyl Cthulhu Idol bank from Diamond Select. The pre-orders for the piece are now shipping, and Raven was kind enough to send over a review after receiving his copy.


"Well, I'm happy! Squint a bit, and this could be a pulp magazine cover illo (see my render above)! At eight inches tall, this vinyl sculpture of Cthulhu differs from Inspector Legrasse's copy (seized as evidence from atop a wooden post at that depraved cult's campsite in a Louisiana swamp) only in being full-colored -- green-and-black, with yellowing aged claws, hunkered down on a gray stone slab inscribed with unknown lettering -- where Legrasse's copy is uncolored stone.
There is the option to spray-paint this with gray "stone-textured" paint from a craft store, but I think I'll keep mine as is; the coloring was nicely done. Also, I could tape over, then paint over, the inconspicuous coin slot on the back, but who knows? I might let Great Cthulhu start guarding my coins someday. The vinyl is thick enough to give the statuette comfortable heft and durability during a hand-to-hand battle with cultists (in either sense of "with"), and would surely survive many years atop a wooden post at your favorite campsite... though perhaps not with coins in it there.
Bravo to Eli Livingston, who clearly sculpted this for the trufans, and to Diamond for following through with the manufacturing and paintjob quality.

Thursday, July 2, 2015
The Venus of Innsmouth
The talented S. D. Williams returns with the Venus of Innsmouth. I love conjectural pieces like this that could pass as a mundane artifact to anyone without knowledge of the Mythos.


Wednesday, July 1, 2015
Foam Fairy Mushrooms
Foam Fest 2015 continues! Heh.
Following up on the earlier experiments with foam pool noodles, I fiddled around with creating a glowing fairy mushroom. This rough proof of concept was banged out using the finest in dollar store materials- a pool noodle for the stem and a pool kickboard for the cap, both made of polyethylene foam. After trimming the parts to size they both received the slash-and-melt treatment before getting heat welded together.

The results of the lighting test were disappointing. I used the same 3 watt LED as in the earlier experiments. As before, the densely packed internal cells of the pool noodle did a fantastic job of transmitting light. Sadly, the very low density cells of the kickboard didn't share that ability. I think the basic concept is sound, but the facet density of the cap has to be high enough to bounce the light throughout the foam.

Moving forward, I need to find a source of high density polyethylene foam. Some industrial suppliers look to have what I need in 'shroom appropriate colors. This may seem like way too much effort for too little reward, but I think giant glowing mushrooms are insanely cool. More importantly, my nieces, wing-wearing fairy princesses all, share my view. There are few motivations more powerful than wanting to be the greatest uncle ever.
Tuesday, June 30, 2015
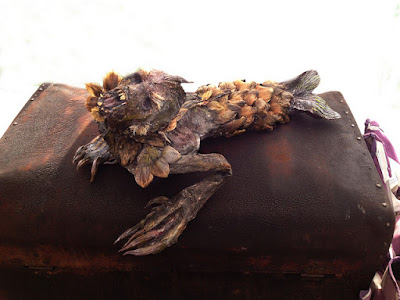
The Fiend of FeeJee
John Glenn brings us this non-traditional FeeJee Mermaid. The heavy armored scales are a very different take from the traditional neo-Victorian depiction, but go really well with the presentation.

Monday, June 29, 2015

Sunday, June 28, 2015
More Tentacle Fun
Let us have a moment of silence for the pool noodles that sacrificed their lives for the cause. You will not be forgotten!
Last week I posted some shots of the awesome textures produced when you slash a pool noodle with a razor knife and then blast it with a heat gun. I picked up a few more pool noodles this weekend to try and refine the process. My ultimate goal was to produce a nice looking tentacle prop. Here's a look at some of the text subjects. As tentacles, these suck. The melting process is too uncontrollable to get a taper down to a point along the length of the noodle.

If you want eyestalks, the results aren't half bad. To get the polyethylene foam to wrap around the eye, in this case a ping pong ball, you have to slash the plastic both vertically and horizontally along one end. Once the plastic is soft you can compress it it into a bulge by pressing the end into a glass plate. Then carefully insert the ping pong ball into the still hot foam and press it into the central cavity of the noodle. I would strongly advise wearing some stout leather gloves when handling the semi-molten plastic.

This is the closest I could get to a tapered tentacle shape. This particular piece was made with a no-name dollar store noodle. The plastic foam is noticeably less dense than noodles available at most big box stores. Trying to cut a taper into the noodle before it undergoes heat treatment is an exercise in frustration. I think it's doable, but you'll need something like a giant pencil sharpener to do it. I can see using a length of PVC to fit inside the central channel of the noodle, and then rotating it around that. An electric foam cutting knife, essentially a heated length of wire, could then trim the end of the noodle to the angle of your choice.

This piece was made from a "Funnoodle"brand noodle produced by Jakks Pacific. They sell the same noodles under a variety of brand names. The foam formulation is much denser than the cheapo dollar store versions and produces more prominent ridges when heat is applied. This would be make some nice tabletop wargaming terrain.

Another "Funnoodle" piece. The plastic melts perpendicularly to the direction of surface cuts, producing the surface ridging effect. Multiple short, shallow cuts produce the eye-shaped openings. Longer, deeper cuts result in the stacked ridges along the top.

While the technique didn't give me the results I wanted, it would be ideal for producing vines or tendrils for a home haunt or low budget film. If you only lightly melt the surface after slashing the noodle the texture is almost identical to a palm tree trunk. They'd be great for some cheap scenery at your poolside tiki bar.
Oh, one last thing, and it may be the coolest part of this whole series of experiments. I wondered what would happen if you stuck a light source inside the central channel of the pool noodle. The results were pretty impressive.

Polyethylene foam has absolutely amazing light transmission properties. I suspect the even illumination is because of the multiple facets of the internal polyethylene cells. The entire length, about 14", lit up with the light from a mini-Maglite LED flashlight powered by two AA batteries. That's from a very modest 3-watt LED. With a string of LED lights threaded through the center you could get the entire length of a pool noodle to glow. Just imagine the cool effects. How about a bio-luminescent plant? Or a glowing fairy mushroom? A wizard's staff? Thanks to the flexibility of the polyethylene foam you could even incorporate it into a costume.
Subscribe to:
Posts (Atom)